In
this tutorial we will see how to install and configure a very useful
plugin to add multiple XML sitemaps to our WordPress powered web site:
Better WordPress Google XML Sitemaps.
We will also learn how to easily extend it by writing a custom plugin
to exclude various items from sitemaps and we'll also write an
additional module to add a new custom sitemap.
Introduction
A sitemap is a powerful tool that allows a webmaster to provide
detailed information about the structure of a site in order to
facilitate the crawling of pages by search engines.
In its simplest form, a sitemap is an XML file that lists URLs for a
site along with additional metadata about each URL (when it was last
updated, how often it usually changes, and how important it is, relative
to other URLs in the site) so that search engines can more
intelligently crawl the site. (Source)
Before we start, let me do a short clarification: I am not the
developer of this plugin, I only used it in a recent project I worked
on. Since I found it very useful, I decided to write a tutorial on
extending it. If you have detailed questions about its features, feel
free to contact the plugin author directly.
Step 1 Install and Configure Better WordPress Google XML Sitemaps Plugin
The main feature of Better WordPress Google XML Sitemaps (BWP GXS) is that it creates a sitemap index
and
different sitemaps for each section of your blog: Posts (in this case
you can also split large sitemaps into multiple smaller ones), Pages,
Custom Posts, Categories, Tags, Custom Taxonomies, Date and Author
Archives, a Google News Sitemap, External Pages and so on... you can
customize all these behaviors and activate the various sections in the
plugin's Settings page.
In addition, this plugin adds a link to the sitemap index to the
robots.txt file of your site.
Lastly, it can be extended in two different ways: through its Hooks
APIs and by creating custom modules. Anyway, you can find very detailed
info about its features
in the plugin page on the WordPress Plugin Repository.
BWP GXS also supports WordPress Multi-site installations.
After the installation and the activation, click the
Sitemap Generator link under the
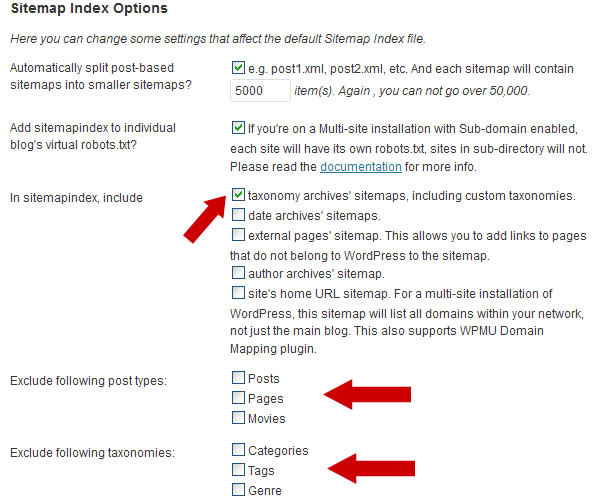
BWP GXS menu. Here you can tune all aspects of the plugin: you can set, for example, the
Default change frequency
of the sitemaps, how many list items and so on... The interesting thing
here is that you have good control over all the active sitemaps: Posts,
Pages, Custom Post Types, Categories, Tags and Custom Taxonomies. For
this tutorial, I created a
Movie Custom Post Type and a
Genre Custom Taxonomy, you can see them in the screenshot.
Now, if you open
http://yoursite.com/sitemapindex.xml (or
http://yoursite.com/?bwpsitemap=sitemapindex
if you don't use permalinks) in your browser, you will see the sitemap
index with the active sitemaps: each link points to the sitemap of a
specific section.
Note that this is also the only URL that you have to set in your web site's Google Webmaster Tools account.
The only limitation here is that it is not possible to
exclude specific items from the respective sitemaps.
Let's say that we want to exclude:
- five posts from the Posts sitemap (post.xml)
- three posts from the Movie Custom Posts sitemap (post_movie.xml)
- one page from Pages sitemap (page.xml)
- two categories from the Categories sitemap (taxonomy_category.xml)
- one tag from the Tags sitemap (taxonomy_post_tag.xml)
- two custom taxonomy items from the Genre sitemap (taxonomy_genre.xml)
How can we do this? Luckily, the plugin can be easily extended thanks to its hooks, so we can write a dedicated plugin.
Create a new file called
bwpgxs-extended-configuration.php, open it in your favourite text editor and paste this:
01
02
03
04
05
06
07
08
09
10
|
|
Copy the file into your
/wp-content/plugins/ directory and activate it on the
Plugins admin page.
Step 2 Exclude Posts and Categories From the Sitemaps
As I said, Better WordPress Google XML Sitemaps Plugin can be extended. According to the plugin description:
In version 1.1.0 more hooks have been added to default modules to
allow easier customization of SQL queries used to build your sitemaps...
(Source)
To be more specific, BWP GXS allows us to exclude Posts, Pages and
Custom Posts through the IDs while it allows us to exclude Taxonomies
through their slugs.
Exclude Items Manually
So, let's use BWP GXS hooks in our
BWP GXS Extended Configuration plugin, specifically:
bwp_gxs_post_where and
bwp_gxs_term_exclude, as explained in the
BWP GXS description page (for more details on WordPress hooks you can read the
About WordPress Hooks paragraph in a
previous article I wrote for Wptuts+).
Add these lines to our
BWP GXS Extended Configuration plugin:
01
02
03
04
05
06
07
08
09
10
11
12
13
14
15
16
17
18
19
20
21
22
23
|
add_filter( 'bwp_gxs_post_where', 'my_bwp_gxs_exclude_posts', 10, 2 );
add_filter( 'bwp_gxs_term_exclude', 'my_bwp_gxs_exclude_terms', 10, 2 );
function my_bwp_gxs_exclude_posts( $query_where_part, $post_type ) {
switch ( $post_type ) {
case 'post': return ' AND wposts.ID NOT IN ( 1, 2, 3, 4, 5 ) '; break;
case 'movie': return ' AND wposts.ID NOT IN ( 7, 8, 9 ) '; break;
case 'page': return ' AND wposts.ID NOT IN ( 6 ) '; break;
}
return '';
}
function my_bwp_gxs_exclude_terms( $excluded, $taxonomy ) {
switch ( $taxonomy ) {
case 'category': return array( 'cat-slug1', 'cat-slug2' ); break;
case 'post_tag': return array( 'tag-slug1' ); break;
case 'genre': return array( 'genre-slug1', 'genre-slug2' ); break;
}
return array('');
}
|
In this way we'll exclude:
- Posts with ID:
1, 2, 3, 4, 5
- A page with ID:
6
-
Movie Custom Posts having ID:
7, 8, 9
- Categories with slug:
cat-slug1 and cat-slug2
- One tag with slug:
tag-slug1
-
Genre Custom Taxonomy, items with slug:
genre-slug1 and genre-slug2
Exclude Items Dynamically
However this solution is not easy to maintain: every time you want to exclude a new item you have to manually edit the
BWP GXS Extended Configuration
plugin core file. It would we better to have a dedicated Settings page
where you can set the items to exclude. To do this, we can tell our
plugin to add a
custom setting panel in the BWP GXS menu.
Add these lines to the plugin:
01
02
03
04
05
06
07
08
09
10
11
12
13
14
15
16
17
18
19
20
21
22
23
24
25
26
27
28
29
30
31
32
33
34
35
36
37
38
39
40
41
42
43
44
45
46
47
48
49
50
51
52
53
54
55
56
57
58
59
60
61
62
63
64
|
<?php
add_action( 'admin_menu', 'my_bwp_gxs_init_admin', 1 );
add_action( 'admin_init', 'my_bwp_gxs_init' );
function my_bwp_gxs_init_admin() {
add_submenu_page( BWP_GXS_STATS, __( 'BWP Exclude items', 'bwp-simple-gxs' ), __( 'Exclude items', 'bwp-simple-gxs' ), BWP_GXS_CAPABILITY, 'bwp_settings', 'my_bwp_do_page' );
}
function my_bwp_gxs_init() {
register_setting( 'my_bwp_options', 'my_bwp' );
}
function my_bwp_do_page() {
$options = get_option('my_bwp');
?>
<div class="wrap">
<div id="icon-options-general" class="icon32"><br></div><h2>Exclude items from XML Sitemaps</h2>
<form method="post" action="options.php">
<?php settings_fields('my_bwp_options'); ?>
<table class="form-table">
<tr valign="top">
<th scope="row"><strong>Post IDs</strong><br /><small>(comma separated)</small></th>
<td>
<textarea name="my_bwp[bwp_exclude_posts]" rows="3" cols="80"><?php echo $options['bwp_exclude_posts']; ?></textarea>
</td>
</tr>
<tr valign="top">
<th scope="row"><strong>Movie IDs</strong><br /><small>(comma separated)</small></th>
<td>
<textarea name="my_bwp[bwp_exclude_movies]" rows="3" cols="80"><?php echo $options['bwp_exclude_movies']; ?></textarea>
</td>
</tr>
<tr valign="top">
<th scope="row"><strong>Page IDs</strong><br /><small>(comma separated)</small></th>
<td>
<textarea name="my_bwp[bwp_exclude_pages]" rows="3" cols="80"><?php echo $options['bwp_exclude_pages']; ?></textarea>
</td>
</tr>
<tr valign="top">
<th scope="row"><strong>Category Slugs</strong><br /><small>(comma separated)</small></th>
<td>
<textarea name="my_bwp[bwp_exclude_categories]" rows="3" cols="80"><?php echo $options['bwp_exclude_categories']; ?></textarea>
</td>
</tr>
<tr valign="top">
<th scope="row"><strong>Tag Slugs</strong><br /><small>(comma separated)</small></th>
<td>
<textarea name="my_bwp[bwp_exclude_post_tags]" rows="3" cols="80"><?php echo $options['bwp_exclude_post_tags']; ?></textarea>
</td>
</tr>
<tr valign="top">
<th scope="row"><strong>Genre Slugs</strong><br /><small>(comma separated)</small></th>
<td>
<textarea name="my_bwp[bwp_exclude_genre]" rows="3" cols="80"><?php echo $options['bwp_exclude_genre']; ?></textarea>
</td>
</tr>
</table>
<p class="submit">
<input type="submit" class="button-primary" value="<?php _e('Save Changes') ?>" />
</p>
</form>
</div>
<?php
}
?>
|
Save the changes, and now you will have a new link in the BWP GXS Plugin menu: the
Exclude items page where you can exclude all items you want:
Now it's time to modify the
my_bwp_gxs_exclude_terms and
my_bwp_gxs_exclude_posts functions to support our custom options and make them work dynamically:
01
02
03
04
05
06
07
08
09
10
11
12
13
14
15
16
17
18
19
20
21
22
23
24
25
26
27
28
29
30
31
32
33
34
35
36
37
38
39
40
41
42
43
44
45
|
function my_bwp_gxs_exclude_terms( $excluded, $taxonomy ) {
$options = get_option( 'my_bwp' );
switch ( $taxonomy ) {
case 'category':
if ( $options['bwp_exclude_categories'] ) {
return explode( ',', $options['bwp_exclude_categories'] );
}
break;
case 'post_tag':
if ( $options['bwp_exclude_post_tags'] ) {
return explode( ',', $options['bwp_exclude_post_tags'] );
}
break;
case 'genre':
if ( $options['bwp_exclude_genre'] ) {
return explode(',',$options['bwp_exclude_genre']);
}
break;
}
return array('');
}
function my_bwp_gxs_exclude_posts( $query_where_part, $post_type ) {
$options = get_option( 'my_bwp' );
switch ( $post_type ) {
case 'post':
if ( $options['bwp_exclude_posts'] ) {
return ' AND wposts.ID NOT IN (' . $options['bwp_exclude_posts'] . ') ';
}
break;
case 'movie':
if ( $options['bwp_exclude_movies'] ) {
return ' AND wposts.ID NOT IN (' . $options['bwp_exclude_movies'] . ') ';
}
break;
case 'page':
if ( $options['bwp_exclude_pages'] ) {
return ' AND wposts.ID NOT IN (' . $options['bwp_exclude_pages'] . ') ';
}
break;
}
return '';
}
|
Step 3 Add a Custom XML Sitemap
BWP GXS can also be extended with additional
modules to
create custom XML sitemaps. This means that you can add a sitemap for a
specific section of your web site that is not part of WordPress' system,
perhaps because it's not integrated into WordPress at the database
level as it uses different database tables from WordPress' default ones.
One great thing is that - through modules - you can take advantage of
the plugin's database, GZip and Caching features.
Let's make an example: I have a photo gallery that uses its database
tables and these tables cannot be accessed directly by WordPress'
internal functions such as
get_posts(), or similar. So, to
access the data, it is necessary to make a direct query to a specific
table. Although the entire photo gallery section is
external to
WordPress, we can create an XML sitemap of the photo albums that will
be linked by BWP GXS in the sitemap index. In this example, for
simplicity, I will make a sitemap only for the albums and not for all
single photos.
Photo Gallery Technical Details
The photo gallery albums are stored in a
photo_gallery table:
1
2
3
4
5
6
7
8
9
|
CREATE TABLE `photo_gallery` (
`album_ID` int(4) NOT NULL AUTO_INCREMENT,
`album_name` varchar(255) NOT NULL DEFAULT '',
`album_nicename` varchar(255) NOT NULL DEFAULT '',
`album_date` datetime NOT NULL DEFAULT '0000-00-00 00:00:00',
`album_status` enum('published','draft','private') NOT NULL DEFAULT 'draft',
PRIMARY KEY (`album_ID`),
UNIQUE KEY `album_nicename` (`album_nicename`)
);
|
Instead, the single photos are stored in another table, but as said,
we will not add the photos' URLs to the sitemap, just album URLs. Every
album has a URL like this:
http://yoursite.com/photo/album-nicename
And all of them will be added the new photo gallery XML sitemap.
It is also strongly recommended - in order to create valid sitemap entries - to have a
datetime> field type in the table.
The BWP GXS Modules Feature
In the
Sitemap Generator admin page, there is a
Module Options section. In the
Alternate module directory field you must set the full path to the directory that will contain the photo gallery sitemap module.
For example you can create a
gxs-modules directory in
wp-content
where you have to put the module's PHP script. Every custom sitemap in
fact, needs its own module: a BWP GXS Module is a simple
.php file that contains a class that extends the
BWP_GXS_MODULE class provided by BWP GXS.
In this page you can also set the number of items to display in the sitemap through the
Get no more than field.
Writing the Photo Gallery Module
Create a new file called
photo_gallery.php. Open it in your favourite text editor and paste this:
01
02
03
04
05
06
07
08
09
10
11
12
13
14
15
16
17
18
19
20
21
22
23
24
25
26
27
28
29
30
31
|
<?php
class BWP_GXS_MODULE_PHOTO_GALLERY extends BWP_GXS_MODULE {
function __construct() {
$this->set_current_time();
$this->build_data();
}
function build_data() {
global $wpdb, $bwp_gxs;
$albums = $wpdb->get_results( "SELECT album_nicename, album_date FROM photo_gallery ORDER BY album_date DESC" );
if ( !isset( $albums) || 0 == sizeof( $albums ))
return false;
$data = array();
for ( $i = 0; $i < sizeof( $albums ); $i++ ) {
$album = $albums[$i];
$data = $this->init_data( $data );
$data['lastmod'] = $this->format_lastmod( strtotime ( $album->album_date ) );
$data['freq'] = "weekly";
$data['priority'] = 1;
$this->data[] = $data;
}
return true;
}
}
?>
|
Two very important things:
- In the
$data['location'] line you must replace http://yoursite.com with the URL of your web site, otherwise the module will throw an empty sitemap error;
- Allowed values for
$data['freq'] are: always, hourly, daily, weekly, monthly, yearly, never;
Finally save it in your
wp-content/gxs-modules directory.
Activating the Photo Gallery Module
Now it's time to tell BWP GXS to load our module. Go back to your
BWP GXS Extended Configuration plugin and add these lines to the
bwpgxs-extended-configuration.php file:
1
2
3
4
5
|
add_action( 'bwp_gxs_modules_built', 'my_bwp_gxs_add_modules' );
function my_bwp_gxs_add_modules() {
global $bwp_gxs;
$bwp_gxs->add_module( 'photo_gallery' );
}
|
If you are using pretty permalinks, you can also have a pretty URL for the Photo Gallery Sitemap page, something like
http://yoursite.com/photo_gallery.xml.
Also add these lines, save, and
don't forget to update your Permalink Settings:
1
2
3
4
5
6
7
|
add_filter( 'bwp_gxs_rewrite_rules', 'my_bwp_gxs_add_rewrite_rules' );
function my_bwp_gxs_add_rewrite_rules() {
$my_rules = array(
'photo_gallery.xml' => 'index.php?gxs_module=photo_gallery'
);
return $my_rules;
}
|
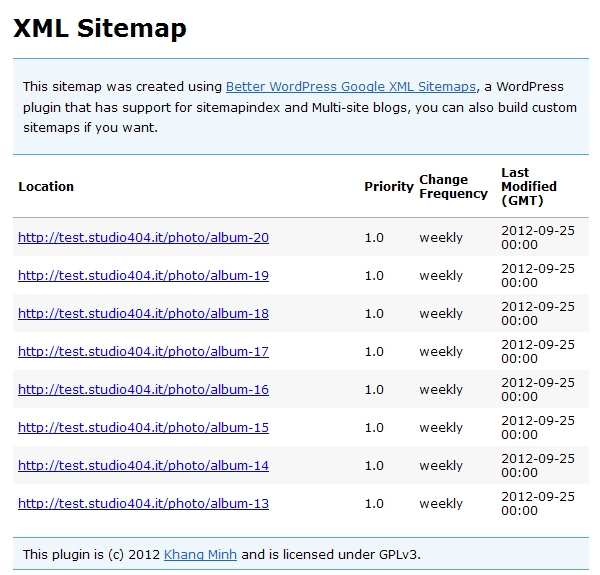
The final result will be this (notice the new custom sitemap
photo_gallery.xml):
If you click the
photo_gallery.xml link, you will see the Photo Gallery XML Sitemap that contains all the links to your photo galleries:
In Conclusion
Better WordPress Google XML Sitemaps is a very useful plugin. It has a
lot of features that we don't have time to talk about here more
extensively, but you can discover all of them once you install it. It's
extremely configurable and extendible, as we have seen, and allows you
to have full support of sitemaps on your web site.
Definitively a very good tool to improve your site visibility on search engines.
References